Tigo Energy is a company that provides smart module technology for solar power systems. The company was founded in 2007 and is headquartered in Los Gatos, California. Tigo Energy’s technology allows for individual monitoring and optimization of solar panels, enabling solar system owners to get the most out of their installations. Its latest innovative product is the Tigo EI ESS, designed to maximize the energy storage performance and efficiency of solar PV systems. In this article, we take a closer look at the Tigo ESS system, exploring its features, benefits, and operation.
The Tigo Energy Intelligence (EI) system is a comprehensive platform for optimizing solar energy systems. It is designed to increase energy production and reduce operating costs, especially in the residential segment. The Tigo EI system offers intelligent module-level monitoring and control solutions that enable solar systems to maximize energy production while minimizing energy losses due to shading, mismatch, or other system problems. With its advanced technology, the Tigo EI System offers a proactive approach to solar energy management, enabling real-time performance monitoring, diagnostics, and troubleshooting.
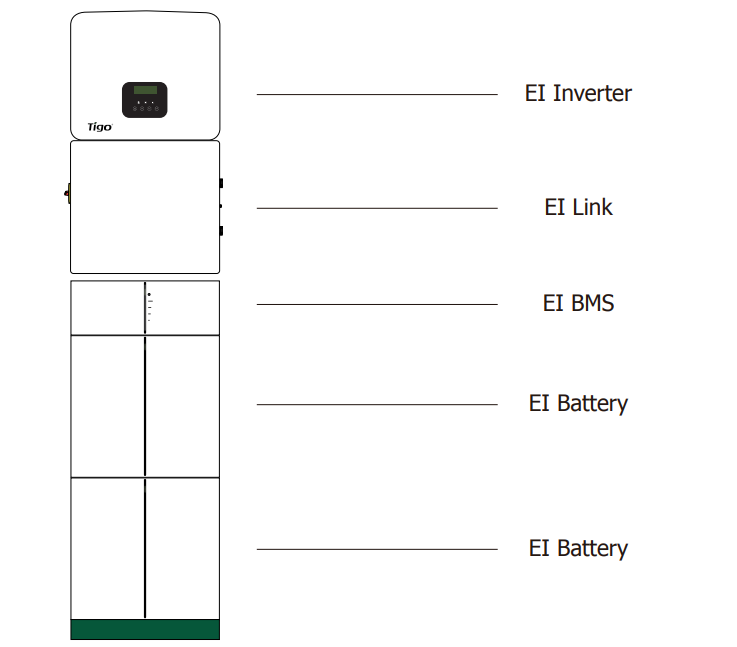
The clean, modern design consists of 4 elements: inverter, distribution box, BMS, and battery. Since Tigo manufactures all the parts of the system, it allows for lightning-fast assembly and very simple commissioning. This avoids many inconveniences, such as compatibility problems with the EI system. The single-phase version is available in 3, 5, and 6 kW solutions, while the three-phase versions are available in 6, 10, and 15 kW. All inverters can be oversized up to 150% on the DC side as required, providing great flexibility for both installers and users. Closely connected to the inverter is the EI Link device, which is a central distribution box: it is connected to the inverter by DC, AC and communication cables. This solution saves time and money, as you only need to fit a few connections. In addition, a CCA kit is integrated, which is Tigo’s monitoring tool. This tool communicates with the Tigo optimizers. If you want to know more about these devices, you can read more about them in our previous article. The 3 kWh battery modules are controlled by the EI BMS, of which 1 is required for each system. This battery controller is responsible for charging or discharging the batteries according to the pre-selected operating mode. It is important to note that for single-phase systems it is possible to connect storage from 3 kWh to 12 kWh, but for three-phase systems a minimum of two batteries is required, so the available sizes are 6, 9 and 12 kWh respectively.
One Phase
Three Phase
No. of batteries
System capacity
No. of batteries
System capacity
1
3 kWh
–
–
2
6 kWh
2
6 kWh
3
9 kWh
3
9 kWh
4
12 kWh
4
12 kWh
Work modes
The El Residental Solution has several modes of operation:
Self-use: this is the most optimal setting in most countries, ensuring that as much of the energy produced locally is used locally as possible. The surplus energy produced during the day that is not used immediately is stored in batteries. Later, in the evening or when the sun is not shining, you can use this energy that you have previously produced and stored. This reduces the load on the electricity grid and cuts our costs.
Time of use: this is useful in regions where time-series billing is used. This solution allows you to charge your battery when the demand for electricity is low, making it cheaper than at other times. In periods when demand is higher, you can export the energy generated and stored in the batteries at a higher rate.
Backup: This mode is useful in situations where there is a power outage but the home or building still needs power. The system acts as a backup power source in the event of a power outage. It is able to completely disconnect from the grid independently, using only solar panels and batteries to power your home.
Installing
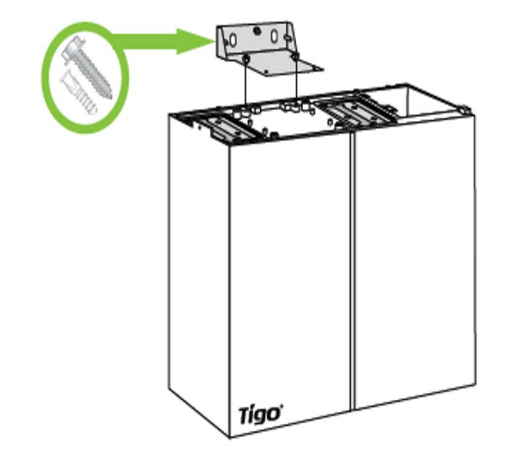
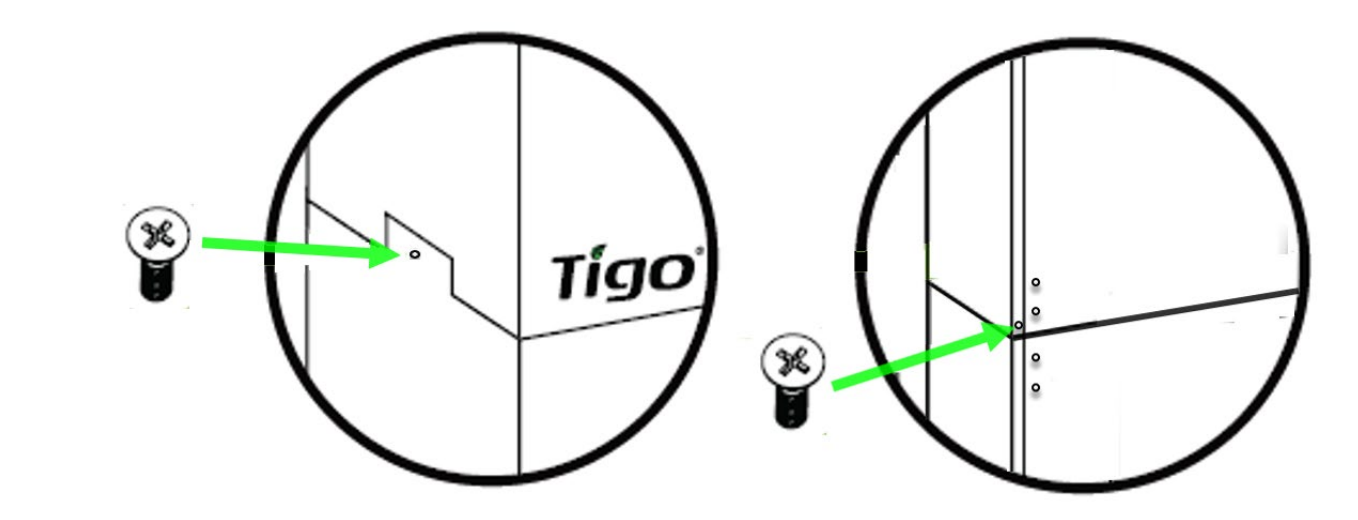
The installation process is really easy and can be done by only one person. The inverter as well as the batteries are lightweight and don’t require multiple people to move or attach to the wall. Both the battery and the inverter are only 34 kg/pc. Do you remember how easy an IKEA assembling manual is? It is almost the same! You only need to follow a few steps and it’s already done! With the battery first: place it on the battery base provided in the box. If you are installing several batteries, you can fix them together with M4 screws. You can fix the top battery to the wall behind it at a distance of 20mm. The BMS is placed on top of the batteries and screwed to the top module in the same way.
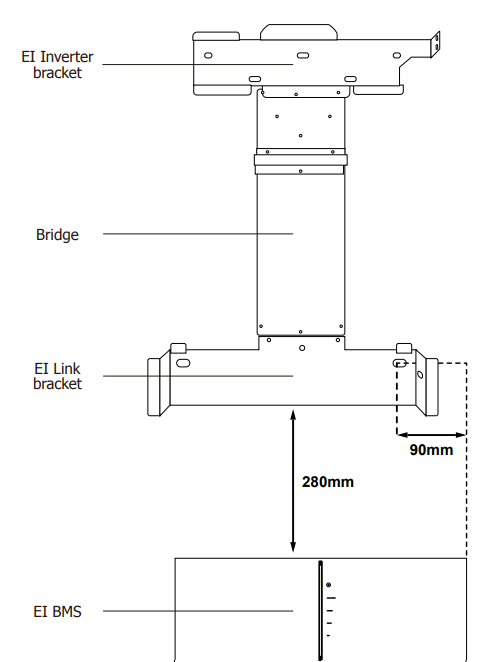
Assemble the inverter and the distributor bracket, then mount them on the wall 280 mm above the BMS, then fix the devices. From here, all you have to worry about is the wiring.
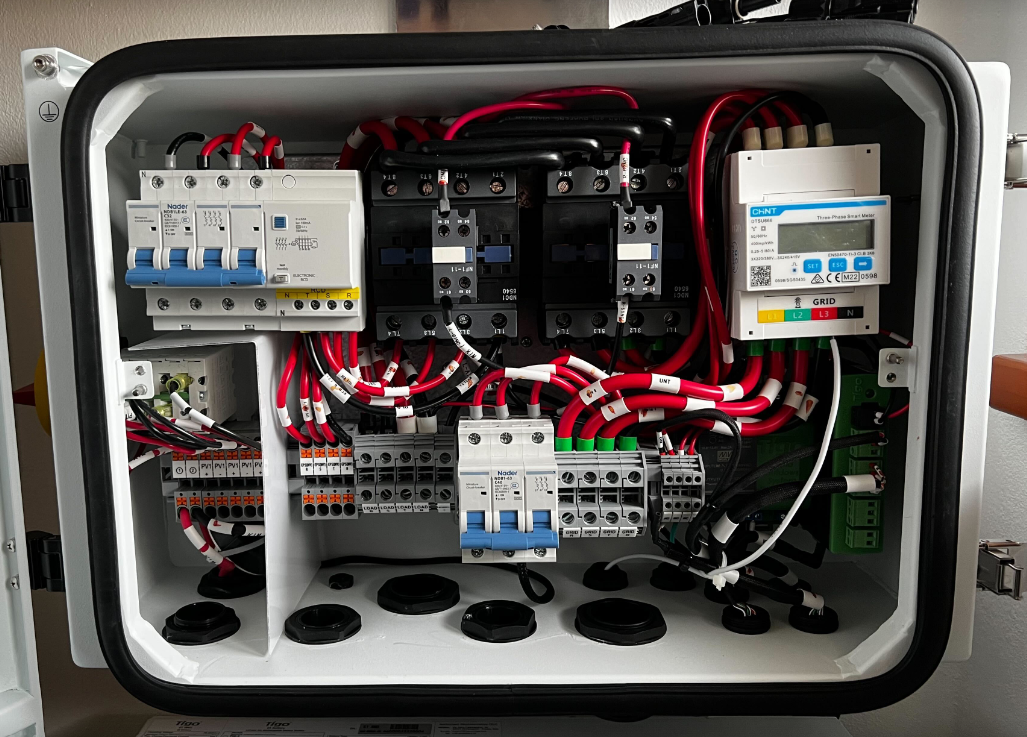
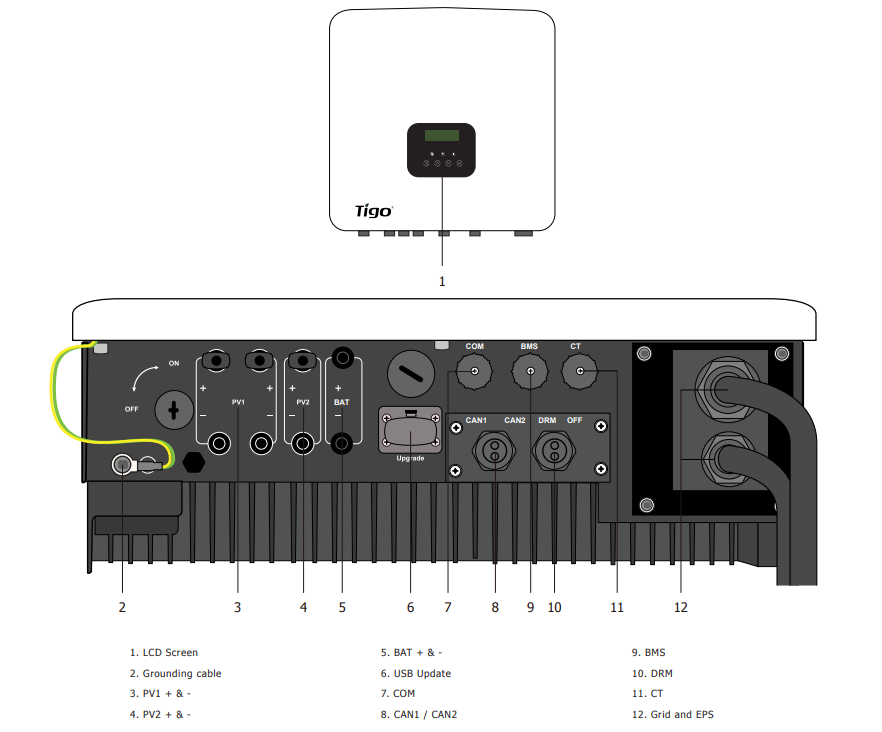
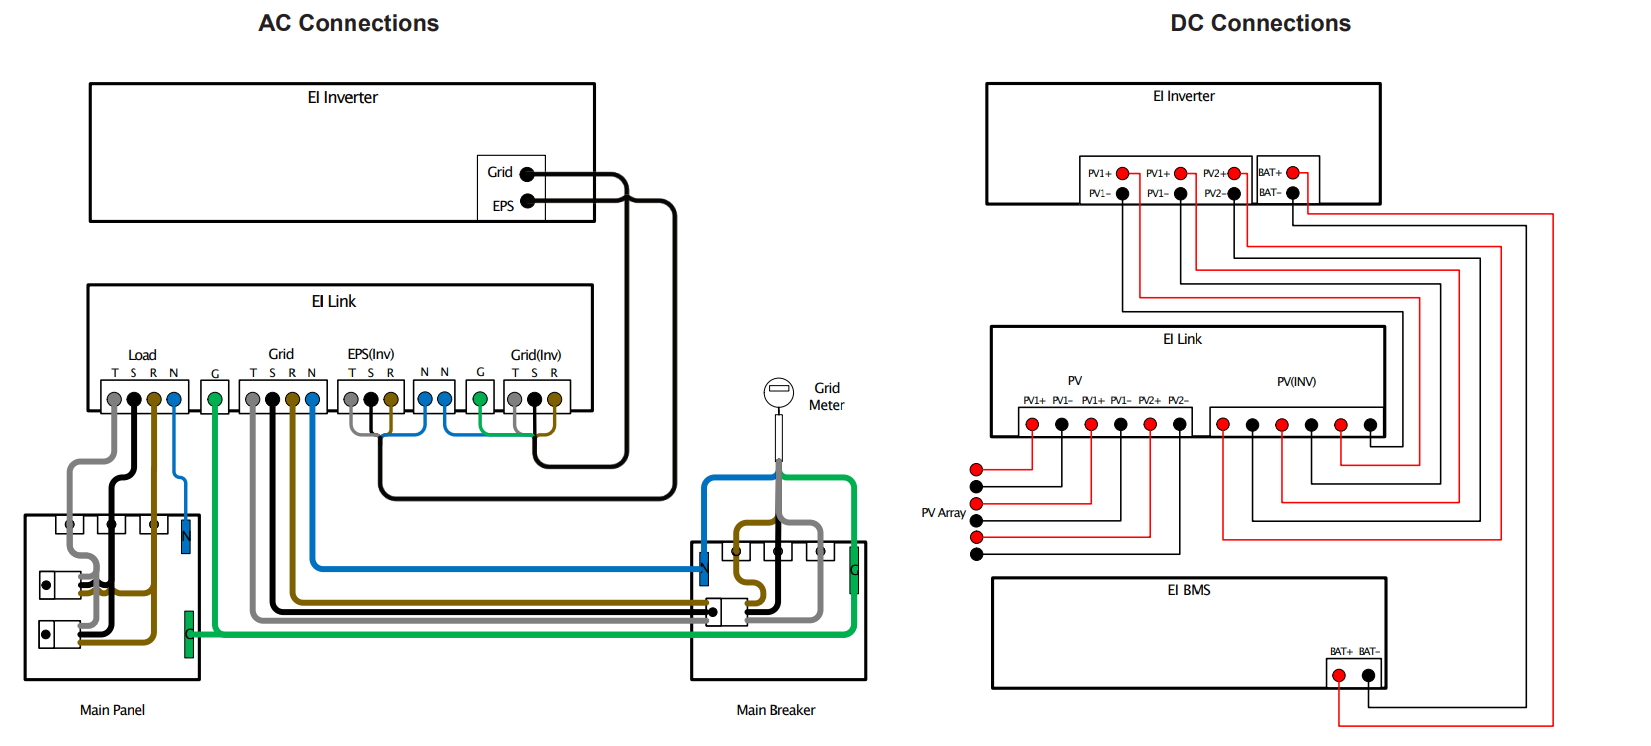
As usual, all the connections are located at the bottom of the inverter, including the DC input, battery connector, and communication port. Unlike other inverters, the Tigo inverter does not have a DC disconnect switch. It is located on the EI Link unit. The AC cables come pre-assembled and just need to be plugged into the EI Link.
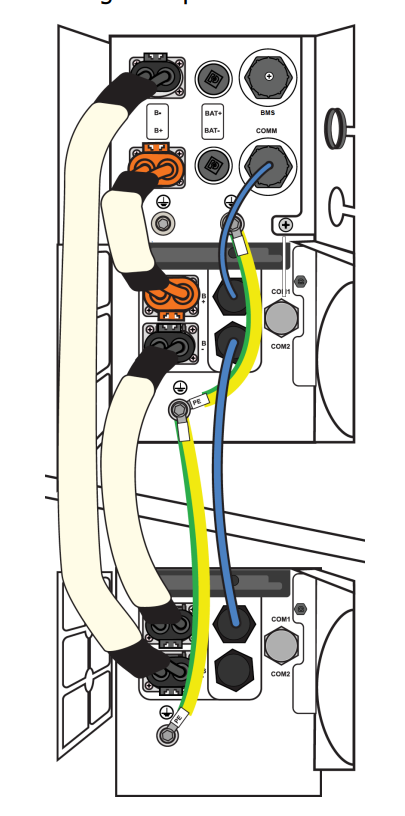
The BAT connector of the inverter must be connected to the BMS using the supplied DC cables. The connector marked BMS on both devices must also be connected using the communication cable also supplied. The smart meter installed in the EI Link shall be connected to the CT marking. After that, you only need to connect the BMS to the batteries: the power cable, the communication cable and the earthing. When all this is done, check again that all the connections are correct.
Commissioning
All you need to set up is a phone. Scan the QR code to download the app you need. Once in the app, you can create a new user account or sign in if you already have one. In the top right corner, click on the + sign to install a new inverter. Enter the name of the location, the date and click Next. Under Select Equipment you can add all the connected devices. Just click Scan and all the components will be automatically detected. If something is still not found, you can add it manually. Once you have added the inverter, you can set the Grid Code, the grid you want to connect it to. Under Batteries & Meters, scan the battery label to validate the warranty. Under PV Modules, you can specify which strings you have installed, with which modules. When you are done, you can return to the main menu to create the physical layout. If you have installed optimisers or TAP devices, you can set up the communication and add the installed TS4s to our system from the Configure Communication menu. You just need to create the end user to provide it with monitoring. The email address and name must be entered, you will then receive an automatic registration email. Following the steps described in this email, you can create an account for yourself. Once all the settings are done, press the Enter button on the inverter for 5 seconds to finalize the settings and start the system.